First inversion
E♭m/G♭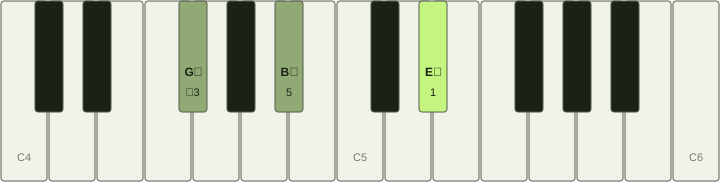
G♭ – B♭ – E♭
THE PIANO CHORD LIBRARY
Play E♭m with E♭, G♭, B♭. Learn the shape, hear the difference, and connect it to your next chord.
ROOT POSITION
Tap a play button to hear the piano.
01 / BUILD THE CHORD
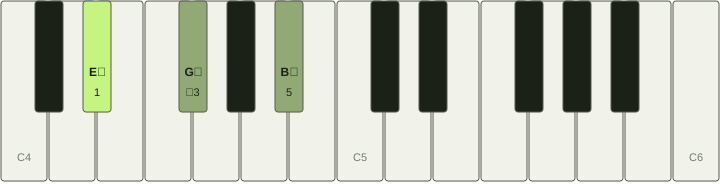
E♭ minor is a three-note chord, or triad: E♭ – G♭ – B♭. Its formula is 1–♭3–5, measured against the major scale starting on E♭.
All three notes are on black keys: E♭ and G♭ and B♭. Move your hand slightly farther into the keyboard so your fingers can reach the black and white keys together.
Another name: D♯ minor uses the same piano keys. Its written notes are D♯ – F♯ – A♯; the spelling changes to suit the musical key.
02 / CHANGE THE BASS NOTE
An inversion rearranges the same three notes. Move the lowest note up an octave to go from root position to first inversion, then do that again for second inversion. The chord stays E♭m.
| Position | Notes | Bass note | Chord symbol |
|---|---|---|---|
| Root position | E♭ – G♭ – B♭ | E♭ | E♭m |
| First inversion | G♭ – B♭ – E♭ | G♭ | E♭m/G♭ |
| Second inversion | B♭ – E♭ – G♭ | B♭ | E♭m/B♭ |
G♭ – B♭ – E♭
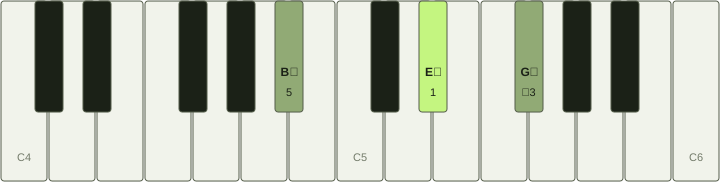
B♭ – E♭ – G♭
A slash names the bass note: E♭m/G♭ means “E♭ minor with G♭ at the bottom.” Use inversions to reduce the distance your hand travels between chords.
03 / GET COMFORTABLE
Finger numbers are 1 = thumb, 2 = index, 3 = middle, 4 = ring, 5 = little finger. Read the suggestions below from the lowest note to the highest note. These are starting points for a relaxed three-note shape; adjust for your hand and the chords before and after it.
| Position | Notes | Right hand | Left hand |
|---|---|---|---|
| Root position | E♭ – G♭ – B♭ | 1–3–5 | 5–3–1 |
| First inversion | G♭ – B♭ – E♭ | 1–2–5 | 5–3–1 |
| Second inversion | B♭ – E♭ – G♭ | 1–3–5 | 5–2–1 |
Start with one hand. Place the fingers silently, play the notes together, then release. Repeat the shape before moving to an inversion. For black-key shapes, treat these fingerings as options to try, not fixed rules; a different finger may make the next chord easier. Position the whole hand farther into the keys instead of reaching with individual fingers.
Chord degrees describe harmony; finger numbers describe your hand. A degree of 3 or ♭3 does not tell you which finger to use. See a published example of these common triad fingering patterns.
04 / PUT IT IN MOTION
Try E♭m – A♭m – B♭m – E♭m. In E♭ minor, these chords form i–iv–v–i. Play each for four steady counts, then return to the beginning.
Start at a pace where every note lands together. The buttons let you hear each chord separately; set your own steady pulse when you play.